CLICK HERE FOR FREE BLOGGER TEMPLATES, LINK BUTTONS AND MORE! »

Sunday, January 30, 2011

The Birthday Robot

This card is for my nephew's 6th b-day that is in a few months. Angie, my sis, is going to be giving him a robot themed b-day party this year, and I decided to go with a robot for his b-day. I think it turned out to be super cute!

First, I cut the robot using the B is for Boy Cart, and pop-dotted him to the card. I also used googly eyes for the little robot.

If you look closely at the center of the Robot's, you will see that I used a small green brad for his little "meter". I only stuck one of the brad's pokers through his paper body and taped it on the opposite side. The other brad poker I colored black with a Sharpie  permanent marker.

I embossed the green sheet of paper under the robot using a Cuddlebug embossing folder. The sentiment was a stamp. I cut the circle and square (that the sentiment is on) out using hole punches.
 
 The Rocket ships were also hole punches; I used silver and orange glitter glue on their flames. I also feel that the robot ribbon gives the card a cute little flare. I really love how this card turned out because it's super colorful, and fun!

Tuesday, January 25, 2011

A Flowery Thank You

This is a pretty simple card. The only Cricut cut is the green vine wrapped around the ribbon. It was cut using the Strait from the Nest cart and I used green glitter glue.

The gold ribbon is not ribbon at all, just a strip of K & Co. paper. Each 3 dimensional flower is made of three seperate layers. They came in a Wedding craft tin from Target, I believe. To make a flower, I punched tiny holes in the center of each layer and inserted a pink gem brad.

The Thank You sentiment is a clear Cloud 9 Design sticker. I measured a piece of purple paper the same exact size as the sticker and trimmed the corners after sticking it to the purple paper.

Sunday, January 23, 2011

Men's Birthday Card

I'm very proud of this card because (1) it's for a man, and cards for guys can be a bit more difficult to create. (2) It doesn't have any glitter on it and I still love it, which is a surprise. LOL

The green and blue paper came from The Paper Studio's Celebration pack, and I used a round corner punch for the corners. I used "paper bag" paper to give it a rough look.

Although the ribbon looks black in the picture, it is actually brown. I had some left over buttons from an  old dress (you can find them at Wal-Mart).

The Happy Birthday sentiment was the only thing cut  using the Cricut. I used the Paper Lace cart. I'm super happy with how the card turned out. :)

Saturday, January 22, 2011

My Very First Blogger Award!!!

Wow! I'm so honored to have received this award from Janice, at Cricutology.
She's super sweet and talented! Check out her fabulous projects!

I'm humbled to be one of eight among some amazingly talented ladies. You'll want to visit all of them and follow. They all do great projects!

Upon receiving this award I must thank the person who gave this to me and link it back to their blog and share 8 things about myself. Also, pass along the award to 8 other individuals that I have recently discovered, and leave a comment so that they can pass along the recognition.

I've recently found some really talented crafters. Here are 8 of their blogs in no particular order for you to check out:

BEEBEEBABS GALLERY

Ashley At Crafty Amour

Raquel at Crafty Creations

Val at Crafty Go Lucky

Anitaandbugs at Crafts from Miracle's Table

Sara at Photography by Sara Neff


Sandra at 365 Days of Cricut

Lillian at Kween Scrapper

8 facts about me:

1.) I am first generation American. My father came her from Czechoslovakia when he was 31, back in the 70's. I am very proud of all that he has been through, just so my sisters and I could have all the opportunities  we could ever want.

2.) Cricutting is my new found addiction!!!

3.) I plan to go back to grad school once I obtain real world experience.

4.) My fav color is green

5.) I LOVE SEAFOOD, especially sushi!!!

6.) My boyfriend Marc and I have been together for 2 yrs. and he is wonderful!

7.) I enjoy cooking, but I hate to bake.

8.) I am currently searching for a position in marketing, but would love to have a career that involves my cricut. :)

Thanks again, Janice!!!!

Hugz,
Ash

Cricutology's Fab Giveaway!!!

SO Janice at cricutology is giving away a texture boutique!! I'm pretty pumped and really hope to win this!! LOL.

Click on the Cricutology link above to get the details or go to http://cricutology.blogspot.com/.

Good Luck!!!

Hugz,
Ash

Tuesday, January 18, 2011

New Years in Paris

This card was inspired by my cousin's love for Paris. It is a 4" x 4" card.

The sentiment was cut using the Wild Card cartridge,  Eiffel Tower from Destinations cartridge, and the the swirly filgree was cut from the Paper Lace cartridge. All of the paper used (pink, gray, black) for each cut was sparkly for a little shimmer.

Pretty simple, but goes the saying, "sometimes simple is more."

Monday, January 17, 2011

Provo Craft Yudu Challenge

For the Yudu challenge, Provo Craft asked for paper crafters to design a card, layout, etc. using specific cartridges and Anna Griffin products, and send the creation to their Utah headquarters.

This is what I came up with. Of the cartridges to choose from, I only had Winter Lace available to me, as well as a stack of Anna Griffin Christmas paper.I was slightly limited, but made it work!

I used the Winter Lace cartridge to cut each snowflake from 2.5" to 3.25". Int the center of each snowflake, I used pink heart-shaped brads. The picture doesn't show it well, but I pop-dotted a couple of the snowflakes, for a little dimension.

The sentiment was found online. On the front it says "Those we love are the snowflakes of Life." and on the inside it says "None are the same, each is beautiful, and all bring something special to our world." by Martin Buber. I printed everything out and left enough room for cutting/trimming. A corner punch was used for the corner hearts.

I was really happy with how it turned out--especially because I was limited to Christmas stuff and was able to create a great V-day card.

Thursday, January 13, 2011

Happy Tweetheart Day

This V-day card is pretty basic, but cute. I cut the bird from the Create a Critter cartridge, The "tweetheart" sentiment was a single cut from the Strait from the Nest cartridge which I cut in half.

I pop-dotted the bird, as well as the bottom of her wing. I glued the top of the wing flat, giving it a little realism and dimension. I also used Studio G glitter glue on the sentiment. A corner punch was used on the card. Overall, I was happy with the results. :)

Monday, January 10, 2011

Smooches V-day Card

I am in love with this creation!! Every component was cut using the Create a Critter cartridge, with the exception of the kiss mark on the male fish's cheek which was cut from the Potpourri Basket cartridge.

If you (the reader) looks closely, you will notice that some of the seaweed is a swirly pattern paper. The solid colored seaweed is glittery green paper.

I used parchment paper for the sand. The picture doesn't show it well, but I used glossy paper for the water, which is the water from the fish bowl icon. A pattern and solid glitter paper were used on both fish. I cut hearts out for their fins. The lips of the girl fish were a heart that I cut in half and trimmed up. 

I used Studio G glitter glue for the random hearts and seashells. The Smooches sentiment came from a pack of chipboard sentiments.

I don't mean to toot my own horn, but I think this card is so stinkin' cute!!!!

Sunday, January 9, 2011

Karen's Blog Candy

Go to http://karens-kakes-krafts.blogspot.com/ and check out Karen's inspiring creations and her newest Blog Candy Post!!!

Hats Off to 2010, Hello 2011

I really like the simplicity of this card. The cartouche mounted on the front and inside of the card were traced from a template and then hand cut. After I cut out the front cartouche, I mounted it on a 4" x 6" card (closer to the card fold). Then once it was mounted I hand cut the rectangular card.

The hat was cut using the Create a Critter cartridge, and I used some Studio G blue glitter clue to accent the hat.

The little whistle I hand cut and used a black Sharpie to write 2011, for the mouth piece and the little black line.

The blue and silver paper is actually a file folder, and the sentiment tag is actually a gray and white striped file folder tag. The "Celebrate" sentiment is a Studio G clear stamp.

Overall, I was pleased with it. :)

Saturday, January 8, 2011

Snowy Thank You

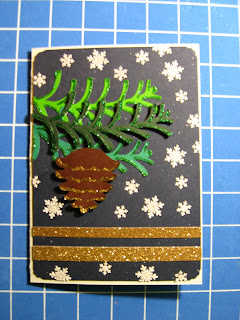
The pine cone and branches were cut using the Potpourri Basket cartridge. I cut the pine cone image four times; for the two separate branches I cut the pine cone off. I also had to make the cut with brown paper and cut the branch off in order to create my own layers. I used green and gold Studio G glitter glue for the branches and pine cone. The dark green branch and brown pine cone were pop-dotted.

I used the Martha Stewart snowflake corner and border punch to create small and large sized snowflakes, and used silver glitter glue on them.

A corner punch was used on the blue template. The glitter gold ribbon is actually K&Co. paper.

I'm happy with how the card turned out, and plan on using it as a Thank You card. :)

Wednesday, January 5, 2011

Celebrate 2011

This card was inspired by another friend of mine. It's a little wild and I love it!!! I guillotine cut the paper, after measuring the dimensions.

The glittery silver strip was Christmas garland from Pat Catan's and I used a corner punch before mounting each piece onto the card base.

The 2011 was cut from the Plantin Schoolbook cartridge and was pop-dotted to the card. The Celebrate sentiment is actually a Studio G clear stamp that I used repeatedly.
I mounted the same sheet of purple paper inside of the card. The "Party Time" sentiment is a Scrappy Cat clear stamp. The confetti is scraps from the green paper and the garland. I liked the added flare!!

Overall I was quite pleased!!!!

Tuesday, January 4, 2011

Celebrate the New Year!!!!!!!!!!!!

I made this card for my sister Angie. The green paper has a gold sheen to it and came from the Canson Treasure Mat paper stack. The two gold and white sheets came from The Paper Studio's Classics paper pack. 

The gold glittery ribbon is actually a slice of paper from a K&Co Christmas paper pack; This paper was also used for the hand-cut champagne bubbles.


The Celebrate sentiment is a stamp on a piece of paper cut by the guillotine cutter. I used a double dash hole punch for the ribbon holes, which was used on both sides of the stamp, and a corner punch for the corners of the sentiment.


The Champagne flute was cut using the Potpourri Basket cartridge. It actually cuts out a two flutes that cross in the center of the glass stems, but I trimmed the other off to turn it into a single glass. I did not like who it looked with the double flute icon.
I mounted a piece of gold paper on the inside of the card with another strip of the gold glitter K&Co paper. I really thought this card turned out to be quite elegant. 

Retro Butterfly Thank You Card

This is the very first card, made with my very own Cricut that I got for Christmas!!!!

The butterfly was cut from the Potpourri Basket cartridge.Once I mounted the layers, I embossed the butterfly and pop-dotted it to the card.

I hand-cut the pointed ribbon, and used a stamp for the "Thank You" sentiment. I also pop-dotted the sentiment. I used a round corner punch for the base of the card, as well as the paper I mounted inside and out. I really love how the colors of the card work so well together!!!!

Peacock Feather Greeting Card

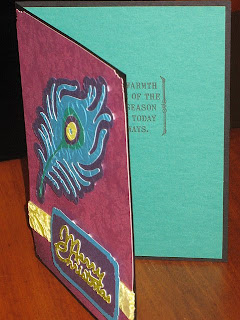
This is an absolute favorite of mine!!!! I made this card for my BF. She and I really love peacock feathers, so I thought it would be fitting for her Christmas Card instead of going with the traditional Christmas theme.

I like this card because it doesn't necessarily have to be a Christmas card. It could be for a Birthday or Just Because.

The feather was cut from the Sentimentals cartridge, and once I mounted it together I embossed it. The "Merry Christmas" sentiment was cut using the Wild Card cartridge, and I mounted it on squares cut by a guillotine cutter, and used a corner punch for each corner. Both the feather and the sentiment were pop-dotted onto the card.

I used blue and purple glitter glue for the feather and lime green glitter glue for the sentiment. The lime green ribbon came from Pat Catan's.
 
I used the same color paper for the inside, that was used for the center of the feather, and a stamp for the inside. Like I said, I'm in love with this card!!!

Pickle?

The Ornament Hunt

My  family has a Christmas ornament tradition. Every year one person buys ornaments for every family member. The ornament must some how relate to that individual, and are hidden on the tree for each person to hunt.

This year I picked out everyone's ornaments and decided to create tags for them. I also introduced my Boyfriends family to the tradition. His sister LOVES pickles, so when I saw a pickle ornament when I was out and about, I just started laughing and had to get it for her!! This is why I created the pickle tag.

I cut the tag itself using a guillotine paper cutter, and I used a line hole punch for the ribbon hole, as well as a corner punch for the corners. The phrase was cut from the Just Because Card cartridge, then I took green glitter glue and glittered it up. I also hand-made the squiggly line under the sentiment.

Merry Christmas Tag

This tag was inspired by my sis, Angie. :) I used a Friskars Circle cutting tool to cut out the tag itself and used a double line hole punch for the ribbon hole.

Using the Wild Card cartridge, I cut each individual branch and the "Merry Christmas"  sentiment. Once I mounted everything on, I took white glitter glue and made all the white icons glittery. I really loved how it turned out!!

Basic Christmas/Themed Gift Tags

These tags are pretty basic, so I just decided to group them together.

The Orange 'T' was made for my niece, who was just accepted into the University of Tennessee. I'm very proud of her!!! The 'T' was cut using the Varsity Letters cartridge. The back is a white 'T' which I cut out separately. I just used a hole punch to put the white rick-rack through.

The Fleur Di Les was cut from the Wild Card cartridge. I used black and silver metallic chalk to make the border slightly more elegant, and the 'peace' sentiment is a stamp. The tag itself I cut with a guillotine cutter and rounded the corners with a corner punch. I used a basic circle hole punch for the ribbon.

The cross was cut from the Easter cartridge. I used gold sparkle glue to jazz it up a bit, and once again I used a tiny whole punch to put the ribbon through.

Sunday, January 2, 2011

Christmas Grill

This tag was inspired by my brother-in-law, who loves his grill!! The tag was cut from Tags, Bags, Boxes and More cartridge. The grill and the spatula was cut from the From My Kitchen cartridge, and I pop-dotted them to the tag after wrapping the Christmas Lights garland around the grill. I was very pleased with how it turned out!!

Gingerbread Man


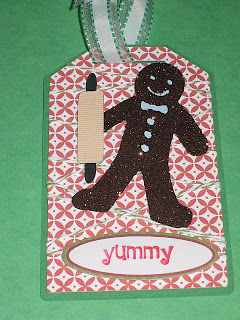
The Gingerbread man and the rolling pin were cut using the From My Kitchen cartridge. I used a sticker maker to make him sticky and then covered him in brown glitter.

The tag was cut from the Tags, Bags, Boxes, and More cartridge. If you look closely you can see the green and white bakers twine wrapped around the first layer of paper. The sentiment "yummy" is stamped on a sticker, and everything was pop-dotted. I was really happy with how this tag turned out!! :)

More Christmas tags

Each of these tags were cut using the Very Merry Tags cartridge. I added snowflakes cut from the Martha Stewart border and corner punches, and decided to glitter some up. For the Santa tag, I used gold foil for the moon.


It's simple, but cute!! I hope you like!!!

Sugar Buzz!

For this tag, I cut the little rectangles with a guillotine paper cutter, and used a corner punch to round the edges. I also used a punch for the ribbon hole.

I embossed the mint green paper with the Sizzex candy folder. The "Sugar Buzz!" sentiment is a stamp. The candy was cut from the Joys of the Season Cartridge. To jazz it up a bit I used pink glitter on the candy and made my own little glitter dots on the white paper. I hope you like it!!!