CLICK HERE FOR FREE BLOGGER TEMPLATES, LINK BUTTONS AND MORE! »
Showing posts with label Christmas. Show all posts

Tuesday, January 4, 2011

Merry Christmas Tag

This tag was inspired by my sis, Angie. :) I used a Friskars Circle cutting tool to cut out the tag itself and used a double line hole punch for the ribbon hole.

Using the Wild Card cartridge, I cut each individual branch and the "Merry Christmas"  sentiment. Once I mounted everything on, I took white glitter glue and made all the white icons glittery. I really loved how it turned out!!

Sunday, January 2, 2011

Christmas Grill

This tag was inspired by my brother-in-law, who loves his grill!! The tag was cut from Tags, Bags, Boxes and More cartridge. The grill and the spatula was cut from the From My Kitchen cartridge, and I pop-dotted them to the tag after wrapping the Christmas Lights garland around the grill. I was very pleased with how it turned out!!
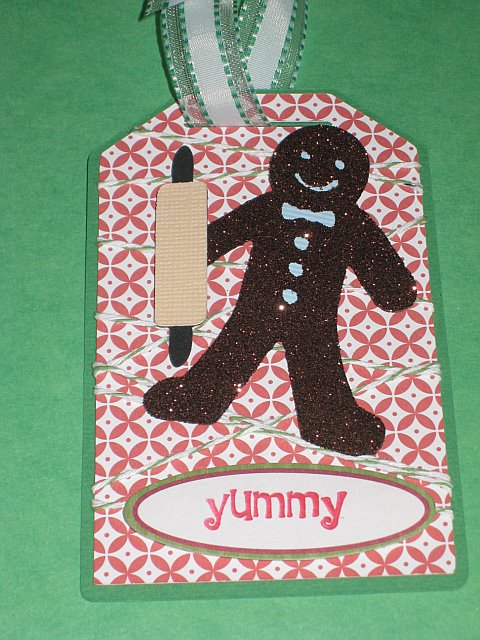
Gingerbread Man


The Gingerbread man and the rolling pin were cut using the From My Kitchen cartridge. I used a sticker maker to make him sticky and then covered him in brown glitter.

The tag was cut from the Tags, Bags, Boxes, and More cartridge. If you look closely you can see the green and white bakers twine wrapped around the first layer of paper. The sentiment "yummy" is stamped on a sticker, and everything was pop-dotted. I was really happy with how this tag turned out!! :)

More Christmas tags

Each of these tags were cut using the Very Merry Tags cartridge. I added snowflakes cut from the Martha Stewart border and corner punches, and decided to glitter some up. For the Santa tag, I used gold foil for the moon.


It's simple, but cute!! I hope you like!!!

Sugar Buzz!

For this tag, I cut the little rectangles with a guillotine paper cutter, and used a corner punch to round the edges. I also used a punch for the ribbon hole.

I embossed the mint green paper with the Sizzex candy folder. The "Sugar Buzz!" sentiment is a stamp. The candy was cut from the Joys of the Season Cartridge. To jazz it up a bit I used pink glitter on the candy and made my own little glitter dots on the white paper. I hope you like it!!!

Thursday, December 30, 2010

The Christmas Eve Visitor

Of all the gift tags this is a favorite of mine. My mom really loves reindeer, and I wanted to do a traditional tag for her.

The Santa & Reindeer snowflake was cut using the It's Cold Outside cartridge.

I used a glittery blue paper for the black out and a red print paper for the snowflake.

I used the Martha Stewart corner snowflake punch for the silver snowflake in the center, and also used a glittery silver paper for the mini snowflake. For the ribbon, I used raffia and a tiny whole punch.

For the reverse side of the card, I used a Friskars tool to cut the cream colored circle. Blue chalk was used to make the edges of the circle smokey, and the small snowflakes were cut from the Martha Stewart border punch.

The 'to:' and reindeer were stamps. I was very proud of this mini creation!!

Blue Penguin

For Christmas this year I traveled to Angie's house to create gift tags for each of my family members. My 9 year old niece's love of Webkinz and animals was my inspiration.

I wanted it to be in pastels, so I decided to make a light blue penguin and go from there. I cut the penguin and the "Just Chillin'" sentiment from the Create a Critter cartridge and colored it's eyes in with a black ballpoint pen.

The snowflakes were from a Martha Stewart border punch. The ribbon holes were also a hole punch.

Before I glued everything to the tag, I embossed the mint green circle with Swiss dots. I used pink glitter for the sentiment and the penguin's scarf as well as pink paper, and white glitter and pink paper for the snowflakes.

Unfortunately the tag did not photograph well at all, but it was so super cute in person!!!

Wednesday, December 29, 2010

Pink Christmas

This card is one of the few cards I had time to create this holiday season. I chose to make a card for my boss, who LOVES the color pink!!

Inspired by her favorite color, I decided to start with a pink Poinsettia. I used the Joys of the Season cartridge to cut out the poinsettia. I cut two of the flowers out.

Then I took one of the flowers ('first flower') and glued it to the single leaf cut--the 'second flower' I left seperate. Then I embossed both flowers separately. I then put adhesive-ready pearls in the center of the 'second flower', and then pop-dotted it
on top at a different angle from the 'first' to give the poinsettia a little dimension. This picture doesn't show the dimension very well, but it is definitely noticeable in person.

I also embossed the pearly paper and mounted it on the pink card after adding the pink satin ribbon. The sentiment was just a basic stamp, and I used a punch for the corners. I was extremely pleased with this greeting card, and my boss decided that it was so pretty and framed it! LOL